 Petit Labs
Building a Flickr Flash Display, Part 1
Resources: Kelvin Luck's flashr library, the fla file and the ActionScript for this tutorial.
Next: Part 2, Adding behavior
When I had no luck in my efforts to make the Flikr Badge XHTML compliant, I decided to make one of my own.
I found Kelvin Luck's flashr, version 0.4 Actionscript Flikr library. It's
not complete, but encapsulates the meat of the Flickr API. The documentation is
good, and he even starts you up by providing a simple example, including an
empty file, UserRecentPhotos.fla, that loads an Actionscript in its first frame.
The whole show is run by this UserRecentPhotos.as script.
To get photos, you have to provide an API key from www.flickr.com and a user id
for the images, you want to show. When that is done, you publish the Flash movie
and run it from within the Flash MX authoring tool, a flash runner or a browser.
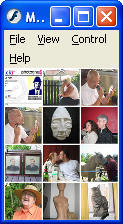
The application gets 16 thumbnail images from the users flickr page, and presents them in a 4 by 4 matrix. Each image carries a link to the corresponding image at Flickr. Very nifty example, that runs out of the box.

Kelvins UserRecentPhotos example application as viewed in Flash Player
Adapting the example player
The goal for this experiment is to mimic the flickr badge, so we have to do some adjustments.
To be able to work through this tutorial you need Flash MX 2004 or later.
You also need Kelvins ActionScript library.
The Actionscript application
In the first frame of the fla file, the UserRecentPhotos Actionscript is imported, and its main function is called.
import com.kelvinluck.flickr.example.UserRecentPhotos;
UserRecentPhotos.main();
The main function is the entry point for the application, and inserts an instance of the UserRecentPhotos class in the _root
public static function main():Void{
	var u:UserRecentPhotos = new UserRecentPhotos(_root);
}
The UserRecentPhotos class
To use the UserRecentPhotos class, we first have to import some library classes and functions
import com.kelvinluck.flickr.Flickr;
import com.kelvinluck.flickr.FlickrResponseListener;
import com.kelvinluck.flickr.Person;
import com.kelvinluck.flickr.Photo;
import com.kelvinluck.util.LogWrapper;
import com.dynamicflash.utils.Delegate;
The com.kelvinluck.util.LogWrapper is a utility class for debugging purposes, an is only used at development time.
The UserRecentPhotos class
class com.kelvinluck.flickr.example.UserRecentPhotos {
	var apiKey:String = "92502cc96511a84c1cfdbf990b71e8c1";
	var userNsid:String = "51035610516@N01";
	var _target:MovieClip;

	function UserRecentPhotos(target:MovieClip){
		Stage.scaleMode = "noScale";

		// initalise logging to Flash's output window
		LogWrapper.getInstance().init();
		LogWrapper.getInstance().addTracePublisher();

		_target= target;
		var _flickr:Flickr = Flickr.getFlickr();
		_flickr.apiKey = apiKey;
		var _flickrResponseListener:FlickrResponseListener
					= new FlickrResponseListener();
		_flickrResponseListener.setSuppressOutput(true);
		_flickrResponseListener.onPeopleGetPublicPhotos
					= Delegate.create(this, onPeopleGetPublicPhotos);
		_flickr.peopleGetPublicPhotos(userNsid, null, 16,1);
	}

	function onPeopleGetPublicPhotos(p:Person):Void {
	}
	public static function main():Void{
		var u:UserRecentPhotos = new UserRecentPhotos(_root);
	}
	public function toString():String{
		return "[com.kelvinluck.flickr.example.UserRecentPhotos]";
	}
}
apiKey is a key for the application we get from www.flickr.com/services/api/misc.api_keys.html.
userNsid is the NSID for the user who's photos we want to present.
_target is the MovieClip to which we want to attach the thumbnail.
The UserRecentPhotos constructor takes one argument which is the target for the thumbnails, in this case the _root movie, or the stage.
The stage is set not to scale, i.e. we want the size of the stage to have an absolute size.
We instantiate a FlickrResponsListener to take care of the response from
flickr.com.
When we get a response, the onPeopleGetPublicPhotos event is fired
and we delegate to the onPeopleGetPublicPhotos event handler to create and lay
out the thumbnails.
Finally we call peopleGetPublicPhotos() with the users NSID, a list of extra information ( here NULL ), the number of thumbnails per page and the number of pages. We will get sixteen thumbnails in one page.
The response handler is responsible for laying out the thumbnails.
function onPeopleGetPublicPhotos(p:Person):Void {
	var photosArray:Array = p.getPhotos();
	var userNsid:String = p.nsid;
	for (var i:Number=0; i<photosArray.length; i++) {
		var thisPhoto:Photo = Photo(photosArray[i]);

		// create a movieclip to load the photo into
		var mc:MovieClip = _target.createEmptyMovieClip("photo"+i, i);

		// position the clips so they form a nice grid
		mc._x = 1 + (i%4) * 76;
		mc._y = 1 + Math.floor(i/4) * 76;
		// create a nested movieclip so that our onPress isn't
		// overwritten by the jpg as it loads
		mc.createEmptyMovieClip("jpgHolder", 1);
		// and load the jpeg into it
		mc.jpgHolder.loadMovie(thisPhoto.thumbnailUrl);

		mc.photo = thisPhoto;

		// add the onPress to this movieclip to link to
		// the relevant photo on flickr.com
		mc.onPress = function()
		{
			getURL(this["photo"].photoPageUrl, "_blank");
		};
	}
}
The response handler takes an instance of Person and creates the thumbnails
array using p.getPhotos().
It then loops over the array and creates a MovieClip attached to the target, in
this case the _root.
Each clip is given a position in the matrix, using some simple math.
An extra trick is used to avoid that the onPress handler for the clip is
overwritten by the loaded JPEG image.
By creating an extra MovieClip, jpgHolder to load the photo and then set the photo of the original MovieClip to thisPhoto, we make sure that the onPress handler will work. Finally we add an onPress handler to the clip. The handler will get the URL of the corresponding image on Flickr, and present it in a new browser window ( taget="_blank".
Adapting the example player
We want to mimic the Flickr Badge, so we have to adapt the UserRecentPhotos
player to give 4 rows with 3 thumbnails in each.
We also have to change the size of each thumbnail and the size of the Stage (
presentation area )
Our modified application will be MyRecentPhotos
The image source
First of all we have to change the API key and the source of images to our own data:
var apiKey:String = "9ee44835b39e2f49deb3c82944ce776c";
var userNsid:String = "94579227@N00";
The API key is the one for the new application and the user NSID is for my Flickr user Petit
The matrix
First of all we need only 12 images to get a 3 by 4 matrix, so we'll have to change that.
_flickr.peopleGetPublicPhotos(userNsid, null, 12,1);
Then the arithmetic in the response handler have to be changed to start a new
row
for each 3 images instead of 4.
// position the clips so they form a nice grid
mc._x = (i%3) * 38; 		// changed i%4 -> i%3
mc._y = Math.floor(i/3) * 38; 	// changed i/4 -> i/3
Here we get a matrix of 3 by 4 with the image MovieClip's upper left corners separated 38 pixels.
Size and scaling
The thumbnails we get from Flickr are 76 by 76 pixels and we need them to be 37 by 37 to fit within the matrix, and to have a one pixel distance between them. We accomplish this by using the scale function on the image MovieClips, scaling them to 49%
mc.jpgHolder.loadMovie(thisPhoto.thumbnailUrl);
mc._xscale=mc._yscale=49; // Maybe we ought to resample
Then of course, the stage is too large, so we have to modify it to fit with
the new image matrix.
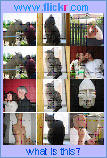
The new "document" size is set to 113 by 151 pixels.
When all that is in order, our application starts to resemble the original Flickr Badge.
Our new application as presented in the Flash viewer
Embedding the Flash movie
In an earlier attempt I had ( link here ) separated the flickr request, the
styling and the JavaScript logic for the Flickr Badge, to be able to work
separately with the different aspects. It was done in the hope of cleaning up
the act, and make the web page validate as XHTML.
In order to make our own badge look like the original badge we introduce the
classifieded divs encapsulating the original badge, and copy the styles to a
Stylesheet. After local testing, we move the lot to a web page on the server.
In my case I copied the results to a sidebar on my blog. The two badges resemble
each other a lot, although the new badge ( temporarily named petikr ) doesn't
have the nice animations.
It's a bit of an stiff upper lip version :)
We'll try to get rid of as much as we can from the object embedding code,
delivered by the Flash authoring tool.
This is how it looks:
<object classid="clsid:d27cdb6e-ae6d-11cf-96b8-444553540000"
codebase="http://fpdownload.macromedia.com/pub/shockwave/cabs/
flash/swflash.cab#version=7,0,0,0"
width="113" height="151" id="MyRecentPhotos"
align="middle">
<param name="allowScriptAccess" value="sameDomain" />
<param name="movie" value="/blog/images/MyRecentPhotos.swf" />
<param name="quality" value="high" />
<param name="bgcolor" value="#ffffff" />
<embed src="/blog/images/MyRecentPhotos.swf"
	quality="high"
	bgcolor="#ffffff"
	width="113"
	height="151"
	name="MyRecentPhotos"
	align="middle"
	allowScriptAccess="sameDomain"
	type="application/x-shockwave-flash"
	pluginspage="http://www.macromedia.com/go/getflashplayer" />
</object>
We can take away all <param>'s in the object tag, but when we'll kill the embed
tag, Firefox doesn't like that.
The whole thing delivered by Macromedia isn't the latest standard.
The other parameters doesn't seem to do any difference, so I'll let them go too.
We now have:
<object classid="clsid:d27cdb6e-ae6d-11cf-96b8-444553540000"
	codebase="http://fpdownload.macromedia.com/pub/shockwave/cabs/
	flash/swflash.cab#version=7,0,0,0"
	width="117" height="156" id="MyRecentPhotos"
	align="middle">
	<param name="movie" value="/blog/images/MyRecentPhotos.swf" />
	<embed src="/blog/images/MyRecentPhotos.swf"
		quality="high"
		bgcolor="#ffffff"
		width="117" height="156"
		name="MyRecentPhotos"
		align="middle"
		allowScriptAccess="sameDomain"
		type="application/x-shockwave-flash"
		pluginspage="http://www.macromedia.com/go/getflashplayer" />
</object>
The align="middle" and the id="MyRecentPhotos" are of no use, since styling is handled by CSS rules on the enclosing divs
So we have:
<object classid="clsid:d27cdb6e-ae6d-11cf-96b8-444553540000"
	codebase="http://fpdownload.macromedia.com/pub/shockwave/cabs/
	flash/swflash.cab#version=7,0,0,0"
	width="117" height="156">
	<param name="movie" value="/blog/images/MyRecentPhotos.swf" />
	<embed src="/blog/images/MyRecentPhotos.swf"
		quality="high"
		bgcolor="#ffffff"
		width="117"
		height="156"
		type="application/x-shockwave-flash"
		pluginspage="http://www.macromedia.com/go/getflashplayer" />
</object>
I'm not even sure about the height and width, as I believe the movie will
claim the area it needs.
Hmm.. well I was wrong there. The box must be defined, otherwise the Flash movie
goes bazurk and gets wider than needed, leaving white areas to the left and
right. It doesn't respect the CSS set width of the surrounding container.
Could we skip the classid="clsid:..."?
Yes, we can! So this is what we have now:
<object codebase="http://fpdownload.macromedia.com/pub/shockwave/cabs/
	flash/swflash.cab#version=7,0,0,0"
	width="117" height="156">
	<param name="movie" value="/blog/images/MyRecentPhotos.swf" />
	<embed src="/blog/images/MyRecentPhotos.swf"
		quality="high"
		bgcolor="#ffffff"
		type="application/x-shockwave-flash"
		pluginspage="http://www.macromedia.com/go/getflashplayer"
		width="117" height="156"/>
</object>
Oh, I see - how about the background attribute in the embed tag?
Well, get rid of it. The white background is inherent in the flash movie.
Now this still doesn't look simple. Referring to Einstein, if it looks
complicated, it's probably not right.
Let's see what Drew McLellan ( kolla stavning ) has to say on A List Apart!
He talks about the Satay method, but let's simplify first.
Here is his generic embedding code, which he claims to validate and work.
<object type="application/x-shockwave-flash" data="movie.swf"
	width="400" height="300">
	<param name="movie" value="movie.swf" />
</object>
MSIE accepts the param name/value and Netscape buys the data="moviename"
That should render:
<object type="application/x-shockwave-flash"
    data="/blog/images/MyRecentPhotos.swf"
    width="117" height="156">
    <param name="movie" value="/blog/images/MyRecentPhotos.swf" />
</object>
Oops! Suddenly a message came up in the flickr badge in huge font:"flickr is
having a massage". Dreaded!
As a matter of fact, the embedding object tag works in both browsers once the
flickr service resurfaced.
XHTML compliance
Time to check for validity, and the look for any necessary additions.
Right: My test page passed the XHTML validation. Really nice!
Adding some chrome to the badge
 Looking
at the original Flickr Badge as delivered from
www.flickr.com, we find that it's a complicated conglomerate of structure,
logic and style. The code we get to paste into an web page, contains some divs
and an iframe. The iframe will get a complete html document form the Flickr
Badge service embedding a Flash movie. The movie will then get the thumbnails
from the service. The HTML markup also contains in line styling.
Looking
at the original Flickr Badge as delivered from
www.flickr.com, we find that it's a complicated conglomerate of structure,
logic and style. The code we get to paste into an web page, contains some divs
and an iframe. The iframe will get a complete html document form the Flickr
Badge service embedding a Flash movie. The movie will then get the thumbnails
from the service. The HTML markup also contains in line styling.
It is an ingenious peace of logic, no doubt, but it is far from standards compliant. With some elaboration, we can separate structure, logic and style. What remains after that though, is the non compliant iframe. As is the case with the <embed> tag, the iframe is not part of the XHTML standard. However, using our own badge we don't need the iframe and we have got rid of the <embed> tag, so the prospect for validity is good.
We want to mimic the looks of the original badge, so we want all the chrome, in form of enclosing divs, functionality and style. We'll use the original separated widgets for this.
Separation of structure, logic and style
When you go to www.flickr.com to get markup for embedding the Flickr Badge into your web page, you get something like this: ( The comments are mine )
<!-- Start of Flickr Badge -->
<!-- Styles for encapsulating divs -->
<style type="text/css">
	.zg_div {margin:0px 5px 5px 0px; width:117px;}
	.zg_div_inner {
		color:#666666; text-align:center;
		font-family:arial, helvetica; font-size:11px;}
	.zg_div a, .zg_div a:hover, .zg_div a:visited {
		color:#0063dc; background:inherit !important;
	   text-decoration:none !important;
	 }
</style>

<script type="text/javascript">
<!-- This Javascript function inserts the Flickr Badge using document.write()
     The whole argument to document-write() must be on one line -->
zg_insert_badge = function() {
	var zg_bg_color = 'ffffff';

	<!-- This is the url to get the UTML content of the iframe -->
	var zgi_url =
	'http://www.flickr.com/apps/badge/badge_iframe.gne?zg_bg_color='+zg_bg_color+'
	&zg_person_id=94579227%40N00';

	<!-- Here we are writing the frame to the document -->
	document.write('
	<iframe style="background-color:#'+zg_bg_color+';
		border-color:#'+zg_bg_color+';
		border:none;" width="113" height="151"
		frameborder="0"
		scrolling="no"
		src="'+zgi_url+'" title="Flickr Badge">
	</iframe>');

	<!-- If the browser supports the DOM we will write the zg_whatlink div
		for toggling the visibility of the zg_whatdiv -->
	if (document.getElementById)
		document.write('<div id="zg_whatlink">
		<a href="http://www.flickr.com/badge_new.gne"
		style="color:#0063dc;" onclick="zg_toggleWhat();
		return false;">
		what is this?<\/a><\/div>');
} // end zg_insert_badge

<!-- This function will toggle the visibility of zg_whatdiv
		if the browser supports the DOM -->
zg_toggleWhat = function() {
	document.getElementById('zg_whatdiv').style.display =
	(document.getElementById('zg_whatdiv').style.display != 'none')
	? 'none' : 'block';
	document.getElementById('zg_whatlink').style.display =
	(document.getElementById('zg_whatdiv').style.display != 'none')
	? 'none' : 'block';
	return false;
}// end zg_toggleWhat

</script>

<!-- zg_div is the outer div that contains all widget parts for the badge -->
<div class="zg_div">
  <div class="zg_div_inner">
	<a href="http://www.flickr.com">www.<strong style
	="color:#3993ff">
	flick<span style="color:#ff1c92">r</span>
	</strong>.com</a>
	<br>

	<!-- Here we actually insert the badge frame and the zg_whatlink div -->
	<script type="text/javascript">
		zg_insert_badge();
	</script>

	<!-- Here is the zg_whatdiv containing extra infromation about the badge -->
	<div id="zg_whatdiv">This is a Flickr badge showing public photos from
		<a href="http://www.flickr.com/photos/94579227@N00">Clas le Petit</a>.
		Make your own badge <a href="http://www.flickr.com/badge_new.gne">here</a>.
	</div>
	<!-- This script hides the zg_whatdiv if the browser supports the DOM -->
	<script type="text/javascript">
		if (document.getElementById)
			document.getElementById('zg_whatdiv').style.display = 'none';
	</script>
  </div>
</div>
<!-- End of Flickr Badge -->
Well, this looks fairly complicated, but we will untangle this mess.
The heart of it all is the call to the service resulting in the iframe source
document.
<iframe src="http://www.flickr.com/apps/badge/badge_iframe.gne?zg_bg_color=ffffff
		&zg_person_id=94579227%40N00"
		width="113" height="151"
		frameborder="0" scrolling="no"
		title="Flickr Badge">
</iframe>
Longer lines, such as iframe and codebase are broken to fit within the page
The iframe is given height and width and the call for the source document is made to http://www.flickr.com/apps/badge/badge_iframe.gne, which is the service or CGI script. There are quite a few parameters that can be sent to the server side. Most are optional and her we send values for zg_person_id and zg_bg_color. The first is NSID of the person who's images we want to show, the second is the background color of the badge.
We have to separate structure, style and logic, by observing how they all
cooperate.
Lets start with the structure!
The structure
<div class="zg_div">
	<div class="zg_div_inner">
	<!-- title goes here  -->
	<!-- iframe goes here by call to the zg_insert_badge -->
		<div id="zg_whatlink">
		<!-- container for the toggler "whats this" -->
		</div>
		<div id="zg_what_div">
		<!-- links to my flickr and to the badge maker goes here -->
		</div>
	</div>
</div>
The outer div "zg_div" contains an inner div "zg_div_inner" that serves as a container for the iframe, the "zg_whatlink" div and the "zg_what_div" div.
The "zg_what" div shows some extra information on the badge and how to make your own.
The "zg_whatlink" div contains a link to switch the visibility of that extra info, if the vrowser supports the (X)HTML DOM Javascript functions.
The style
Here we have to extract the styles from different places in the markup snippet.
For the frame we have

background-color:#'+zg_bg_color+';
border-color:#'+zg_bg_color+';
border:none;"
width="113"
height="151"
frameborder="0"
scrolling="no"
where zg_bg_color is ffffff
For the  containers zg_div and zg_div_inner we have from <style> tag
.zg_div {
	margin:0px 5px 5px 0px;
	width:117px;
}
.zg_div_inner {
	color:#666666;
	text-align:center;
	font-family:arial, helvetica;
	font-size:11px;}
.zg_div a, .zg_div a:hover, .zg_div a:visited {
	color:#0063dc;
	background:inherit !important;
	text-decoration:none !important;
}
For the flickr logo we have a <span> with color:#ff1c92. One solution to lift this to the Stylesheet, is to classify two <span>'s and write the linked logo as
<a href="http://www.flickr.com">www.<strong>
	<span class="the_flick">flick<span class="the_r">r
	</span></strong>.com</a>
All this styling will go into the Stylesheet for our web page. This is what we get:
/* the outer and inner divs*/

.zg_div {
	margin:0px 5px 5px 0px;
	width:117px;
}

.zg_div_inner {
	color:#666666;
	text-align:center;
	font-family:arial, helvetica;
	font-size:11px;}

.zg_div a, .zg_div a:hover, .zg_div a:visited {
	color:#0063dc;
	background:inherit !important;
	text-decoration:none !important;
}

/* the badge*/

.badge{
	background-color:#fff;
	border-color:#fff;
	border:none;
	width: 113px;
	height:151px;
}
/* the logo */
.the_flick{
	font-weight:bold;
	color:#3993ff;
}

.the_r {
	font-weight:bold;
	color:#ff1c92;
}

#zg_whatlink a{
	color:#0063dc;
}
The logic
If we want to use the original Flickr Badge and the frame delivered, we'll
want to move as much as possible of the Javascript to the document header.
As we now can place the iframe directly below the title in the "zg_div_inner"
container, we don't need the zg_insert_badge() function.
( Small applause goes here ;)
We hide the zg_whatdiv container if we can use the DOM. This script must run as
soon as we load the page and there are no advantages in moving this to the
document <head> section.
<script type="text/javascript">
	if (document.getElementById)
		document.getElementById('zg_whatdiv').style.display = 'none';
</script>
To use Javascript in a valid XHTML document, we will have to encapsulate the
script in a CDATA section. Alternatively we have to use entities for anything
that has special meaning in XML. This can go into the <head>section of the
document. The old fashioned HTML comment like way of hiding the script from
"older browsers" is no longer motivated. The toggler function is a bit strange,
as it seems to toggle the value of the display property twice.
One switch would be enough.
<script type="text/javascript">
zg_toggleWhat = function() {//<![CDATA[
	document.getElementById('zg_whatdiv').style.display =
	(document.getElementById('zg_whatdiv').style.display != 'none')
	? 'none' : 'block';
	return false;
}// ]]>
</script>
Here is the completed new Flickr badge inclusion. Much cleaner and simpler. By separating out the styling we can change the chrome, adding borders, background and margins to the different containers.
<div class="zg_div">
  <div class="zg_div_inner">
    <a href="http://www.flickr.com">www.<strong>
    <span class="the_flick">flick</span>
    <span class="the_r">r</span></strong>.com</a>
    <br />
    <iframe class="badge"
    src="http://www.flickr.com/apps/badge/badge_iframe.gne?zg_bg_color=ffffff
    &zg_person_id=94579227%40N00" scrolling="no">
    </iframe>
    <div id="zg_whatlink">
      <a href="http://www.flickr.com/badge_new.gne"
      onclick="return zg_toggleWhat();">
      what is this?</a>
    </div>
    <div id="zg_whatdiv">
      This is a Flickr badge showing public photos from
      <a href="http://www.flickr.com/photos/94579227@N00">Clas le Petit</a>.
      Make your own badge <a href="http://www.flickr.com/badge_new.gne">here </a>.
    </div>
    <script type="text/javascript">
	if (document.getElementById)
		document.getElementById('zg_whatdiv').style.display = 'none';
    </script>
    </div>
</div>
Using our own badge
One reason for using our own badge is to make the the insertion valid XHTML, so we wanted to get rid of the iframe. It also has the advantage, that we can further develop the badge and tune it to our hearts content.
Here is the clean and simple inclusion markup for our own badge. As before the toggle script goes into the <head> section of the page, and the style rules are added to the Stylesheet.
<div class="zg_div">
  <div class="zg_div_inner">
	<a href="http://www.flickr.com/photos/94579227@N00">
	<strong>p<span class="the_r">e</span>tik<span class="the_r">r</span> Badge</strong>
	</a>
	<object type="application/x-shockwave-flash"
		data="examples/MyRecentPhotos.swf" width="113" height="151">
		<param name="movie" value="examples/MyRecentPhotos.swf" />
	</object>
	<div id="zg_whatlink">
      	<a href="http://www.flickr.com/badge_new.gne" onclick="return zg_toggleWhat();">
      		what is this?</a>
    	</div>
	<div id="zg_whatdiv">
      		A petikr badge showing public photos from
      		<a href="http://www.flickr.com/photos/94579227@N00">Clas le Petit</a>.
      		Make your own badge <a href="http://www.flickr.com/badge_new.gne">here </a>.
    	</div>
    	<script type="text/javascript">
		if (document.getElementById)
			document.getElementById('zg_whatdiv').style.display = 'none';
	</script>
  </div>
</div>
Next: Part 2, Adding behavior
To do
Parameterized for user, number of images, matrix.
Tween for image size - automatic ( interval ) or manual ( mouseover )